Install PiHole With SSL On Apache Running Ubuntu Server 20 LTS

This is another quick post to serve as a general note. This post will cover the install of PiHole with SSL on Apache. The guide should work for most Debian-based Linux distributions. We are running PHP7.4 as it’s native to the OS and does not require any PPA addons. You can install PHP8/+ if you like.

Step 1: Bash Into root

sudo bash

Enter your password.

Step 2: Install Apache2

apt-get install apache2 -y

Step 3: Install PHP 7.4

apt-get install php -y
apt-get install php-common php-mysql php-xml php-curl php-cli php-imap php-mbstring php-opcache php-soap php-zip php-intl php-sqlite3 -y

Step 4: Install PiHole

curl -sSL https://install.pi-hole.net | bash

During the course of the install, you will be prompted ~5 times. At the last prompt, you will be asked if you want to install the Lighttpd web server. At this point, you want to select no and complete the install process.

Once completed your PiHole setup should work. and should be accessible via ip/domain.com/admin/

Step 5 Cleanup:

As of today, I have noticed a rare glitch that will cause the folder structure to be odd after the pihole install. This can be easily fixed with the following details.

The default install will create folders like this:

pihole folder: /var/www/html/pihole
admin folder: /var/www/html/admin

Although not a big deal, this causes a problem when trying to access the admin dashboard from the default pihole URL (http://ip/pihole), the link on the page that is supposed to link to the admin page will be broken. At this point, you can update the page link manually in pihole/index.php to forward to the correct URL or you can change/move folders to your liking.

To fix this issue, as root, first we move the folder to the correct directory.

mv /var/www/html/admin /var/www/html/pihole

Second, we update the default pihole root index file links

vim /var/www/www/html/pihole/index.php

We want to edit three lines 77, 81, and 83 to reflect the new URL structure.

#Line 77: 
<link rel='shortcut icon' href='/pihole/admin/img/favicons/favicon.ico' type='image/x-icon'>

#Line 81:
<img src='/pihole/admin/img/logo.svg' alt='Pi-hole logo' id="pihole_logo_splash">

#Line 83:
<a href='/pihole/admin/'>Did you mean to go to the admin panel?</a>

Once done you can consider the process complete.

Step S: Installing SSL on PiHole:

To keep things classy, if not already, bash into root:

sudo bash

Let’s enable the PHP’s SSL module and make our SSL folder to house our certs.

a2enmod ssl
mkdir /etc/apache2/certs/pihole

Now let’s generate our self-signed cert:

openssl req -x509 -nodes -days 365 -newkey rsa:2048 -keyout /etc/apache2/certs/pihole/piholio.key -out /etc/apache2/certs/pihole/piholio.crt

Edit our default SSL virtual hosts config:

vim /etc/apache2/sites-available/default-ssl.conf

Replace lines 32 and 33 with the following lines

SSLCertificateFile /etc/apache2/certs/pihole/piholio.crt
SSLCertificateKeyFile /etc/apache2/certs/pihole/piholio.key

Save and exit.

Next, enable SSL and restart the apache service:

a2ensite default-ssl.conf && systemctl restart apache2

At this point, you’ve successfully installed PiHole with SSL. We have another issue, by default apache does not reroute to SSL so you will still be able to visit the non-SSL URL. To fix this we need to enable the Rewrite module and enter our conditions into our domain’s virtual host configuration (or .htaccess).

Let’s enable that rewrite module:

a2enmod rewrite
systemctl restart apache2

Let’s edit our default virtual host file:

vim /etc/apache2/sites-available/000-default.conf

Add the following three lines of code before the </VirtualHost> closing tag.

RewriteEngine On
RewriteCond %{HTTPS} off
RewriteRule ^ https://%{SERVER_NAME}%{REQUEST_URI} [END,NE,R=permanent]

Save the file and restart Apache.

systemctl restart apache2

Your PiHole install should now be “running in SSL”. If anyone viewing my notes has questions feel free to leave a comment.

Install PHP8 on Ubuntu Server 18 & 20 LTS Running Apache

This post is a quick post to serve as a note, don’t expect long explanations of general LAMP stack design concepts. If you encounter any issues feel free to leave a comment below.

Step 1: Bash Into root User

sudo bash 
#("sudo -su" if you prefer)

Enter your password to enter the root superuser account.

Step 2: Preparation

As root enter

apt-get update -y && apt-get upgrade -y && apt-get dist-upgrade -y && apt-get autoremove -y && apt-get autoclean -y

Step 3: Adding PHP8 Repository

apt-get install ca-certificates apt-transport-https software-properties-common -y

Once the command above completes its process:

add-apt-repository ppa:ondrej/php -y && apt-get update -y

Step 4: Installing PHP8

apt-get install php8.0 libapache2-mod-php8.0 -y && systemctl restart apache2 
apt-get install php8.0-fpm libapache2-mod-fcgid

Enable default PHP8 FastCGI manager module and config:

a2enmod proxy_fcgi setenvif
a2enconf php8.0-fpm

Restart Apache:

systemctl restart apache2

You might need these as well… MySQL, MBString, and MailParse

apt-get install php8.0-mbstring php8.0-mailparse php8.0-mysql php8.0-xml php8.0-zip -y

WordPress Modules

apt-get install php8.0-imagick -y

*****

To get jiggy with it… (installs all PHP modules, typically reserved for DevOps/Sandboxing)

apt-get install php8.0-dev

*****

Once you’re done with installing any additional modules, although not required, it’s recommended you reboot your machine. Let’s do a little cleanup in case something unnecessary (like previous PHP7 packages) was left behind.

apt-get update -y && apt-get upgrade -y && dist-upgrade -y && apt-get autoclean -y && apt-get autoremove -y && reboot

Step 5 (Optional): Additional Caching Modules

Memcached

apt-get install php8.0-memcached

Redis

apt-get install php8.0-redis

Solving the PHP Warning: fsockopen(): unable to connect (Connection timed out)

If you’ve worked with APIs you’ve probably gotten this error and know how annoying it is. All because the native function never returns any actionable error for its request timing out. The best way to detect if the fsockopen() function request is timing out is to use a error control operator. The idea is to suppress the timeout warning with a @ prefix, so the function only returns true if it completes its cycle/request. You can review the example PHP code below.


if($fp = @fsockopen($host, $port, $errno, $errstr, $timeout)) {   

return true;

}else{
  
return false;

}

Issues? leave your questions.

PHP CLI & Terminal Colors

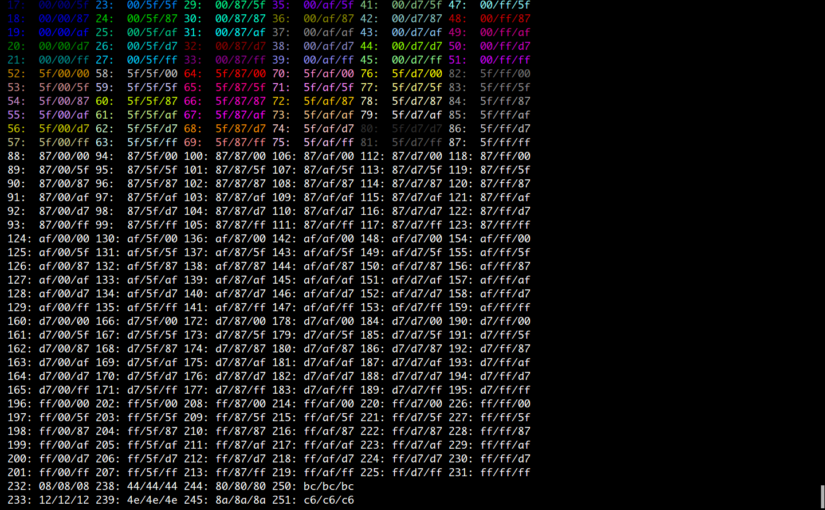
A Simple PHP class for wrapping your console/terminal output text in color. Keep in mind that building a class for such projects will require customization as each terminal emulator will process colors a bit differently. For the most part, the colors in this class work with any popular terminal emulator.

<?php

class CLI
{

// this function requires 1 variable, content. The color arguement is optional.
function cout_color($content, $color=null)
{

// if a color is set use the color set.
if(!empty($color))
{
// if our color string is not a numeric value
if(!is_numeric($color))
{
//lowercase our string value.
$c = strtolower($color);

}
else
{
// chec if our color value is not empty.
if(!empty($color))
{

$c = $color;

}
else
{ 
// no color was set so lets pick a random one...
$c = rand(1,14);

}

}

}
else// no color @paramter was passed, so lets pick a random one...
{ 

$c = rand(1,14);

}

$cheader = '';
$cfooter = "\033[0m";

// let check which color code was used so we can then wrap our content.
switch($c)
{

case 1:
case 'red':

// color code header.
$cheader .= "\033[31m";

break;

case 2:
case 'green':

// color code
$cheader .= "\033[32m";

break;

case 3:
case 'yellow':

// color code
$cheader .= "\033[33m";

break;

case 4:
case 'blue':

// color code
$cheader .= "\033[34m";

break;

case 5:
case 'magenta':

// color code
$cheader .= "\033[35m";

break;

case 6:
case 'cyan':

// color code
$cheader .= "\033[36m";

break;

case 7:
case 'light grey':

// color code
$cheader .= "\033[37m";

break;

case 8:
case 'dark grey':

// color code
$cheader .= "\033[90m";

break;

case 9:
case 'light red':

// color code
$cheader .= "\033[91m";

break;

case 10:
case 'light green':

// color code
$cheader .= "\033[92m";

break;

case 11:
case 'light yellow':

// color code
$cheader .= "\033[93m";

break;

case 12:
case 'light blue':

// color code
$cheader .= "\033[94m";

break;

case 13:
case 'light magenta':

// color code
$cheader .= "\033[95m";

break;

case 14:
case 'light cyan':

// color code
$cheader .= "\033[92m";

break;

}

// wrap our content.
$content = $cheader.$content.$cfooter;

//return our new content.
return $content;


}


}

?>


$cli = new CLI();

// echo a string using the class string color 'red'.
echo $cli->cout_color('It Works!', 'red');

// echo a string using the class color id 1.
echo $cli->cout_color('It Works!', 1);

// echo a string using a random color.
echo $cli->cout_color('It Works!');

Add/Remove based on your project requirements.

Consider avoiding viewport values that prevent users from resizing documents Validation Error

So apparently this new rule/standard went into effect December 2016 causing this “Consider avoiding viewport values that prevent users from resizing documents” HTML5 validation error. To fix it make sure your:


Tag does not have the “maximum-scale=1.0” value, it’s that simple :)


*** UPDATE***

make sure you remove the following values:

  1. maximum-scale=1.0
  2. user-scalable=no

Source: https://github.com/validator/validator/commit/7cfc964d343cbd677beee32dad8f8e6ecab1210b

Thanks to Gaspard d’Hautefeuille for the update notice.

The Shady SEO Email Sales Pitch & Why I’m building A Public API To Stop IT!

Doing legitimate business now days is becoming quite cumbersome but you know what really grinds my gears (Peter Griffin reference lol…)? Shady SEO sales emails, I have a lot of SEO clients who seem to be receiving emails from salesmen with fake GMail accounts promising them better ranking through their site’s contact forms. The problem is the clients receiving these emails are clients already Ranking 1-5 on Google, Bing & Yahoo. Here is an example of what these sales emails look like…

Cristina Matthews
phone:206-309-XXXX
email:matthewscristina12@gmail.com

we can help your website to get on first page of google and increase the number of leads and sales you are getting from your website. please email us back for full proposal.

best regards,
cristina

It takes in some cases a lot of work to get these clients to the first page of any search engine and these clowns try to take advantage of uninformed business owners by getting them to try to switch to them. Now I have no problem with honest business but this is just shady period!. If you’re so confident about your process, business or model why send out covert emails? Why would you be pitching SEO incognito?
People like this make me sick and have no sense of honor, most likely trained by some sales clown with a suit in a call center (shell company) who resells one-size-fits-all SEO packages for another “SEO” company who wants to make easy money from people who already have put in the hard work. I have already built an anti-solicitation framework for internal business operations to try to eliminate these type of sales pitches but now I’m going to take it a step further.
For the next few weeks I will be working on a public API to stop all people with flagged email and IP addresses associated with these types of sales tactics. Just for fun I am thinking of also putting up a public wall of shame for people to view the type of shady emails sales pitches to look out for.

Updating To PHP 5.4 On Ubuntu Server 12.04 LTS

If you use php web applications then your know a lot are now demanding to be updated to php 5.4 or higher. To do this in Ubuntu 12.04LTS simply do the following…

If you haven’t already used ppa then you will have to first install python software properties, make sure you’re the root user… ( sudo bash )

apt-get install python-software-properties

PHP 5.4.x run:

add-apt-repository ppa:ondrej/php5-oldstable

PHP 5.5.x run:

add-apt-repository ppa:ondrej/php5

Once you’ve added the repo simply update and upgrade current packages & distribution packages with one simple command :)

apt-get update && apt-get upgrade -y && apt-get dist-upgrade -y

Another Flash Project Originally Designed For Web Semantics in 2008

I was going through an old hosting account making sure I had backed up everything before it deletion and found some old work. This is was a flash project I originally created for Web Semantics (Web Symantecs) during its early conception. Considering this was done in 2005 and then updated in 2008 I have to say it’s still a pretty cool animation design. I’m just glad I was able to find it, I still can’t believe I was doing this with Macromedia Flash 7 and 8 (Macromedia was later bought out by Adobe), you can view the actual flash animation by clicking here.

Installing OwnCloud On Ubuntu Server 12.04 With SSL Support

Tired of paying for dropbox services? Why not use owncloud to setup your own personal and secure dropbox for free :)


Follow the steps below as root:


  1. Bash in to get root access… ( sudo bash ).
  2. Install server dependances ( apt-get install apache2 php5 php5-gd php-xml-parser php5-intl vim-nox ).
  3. Install more server dependances ( apt-get install php5-sqlite php5-mysql php5-pgsql smbclient curl libcurl3 php5-curl ).
  4. Download owncloud source files from http://owncloud.org/sync-clients/#linux
  5. Upload extracted files to your apache root ( default is located at /var/www ), you can install vsftpd server( apt-get install vsftpd )or any other type of ftp server service.
  6. Inside your owncloud root directory create a new folder called “data” ( mkdir data )
  7. For owncloud to configure & work correctly apache needs to be given ownership of certain folders so their is no problem for apache to read and write data inside your website.Run the following commands.
    ( chown -R www-data:www-data /var/www/apps )
    chown -R www-data:www-data /var/www/config )
    chown -R www-data:www-data /var/www/data )Note: Keep in mind that /var/www is just the default root folder of apache yours might be different, just make sure you make the appropriate changes so they point to your apache/web install.


  8. Your going to want to enable mod_rewrite ( a2enmod rewrite ).
  9. Restart your apache service ( service apache2 restart )
  10. Create a new database in mysql and call it owncloud, create a new user and password with specific access to the owncloud database. These credentials will be used later in the process.


Now lets install our SSL and get it configured correctly:


  1. Enable SSL Module ( a2enmod ssl )
  2. Now your going to want to create a directory to store your SSL certs ( mkdir /etc/apache2/ssl )
  3. now lets generate a general cert with the following command ( openssl req -x509 -nodes -days 365 -newkey rsa:2048 -keyout /etc/apache2/ssl/apache.key -out /etc/apache2/ssl/apache.crt )

    Note: Your going to be asked a couple of questions after you run this command, answer them as accurate as possible as this will be displayed on your cert when people try to access your site.
  4. Edit default-ssl in sites-available folder in your apache install ( vim /etc/apache2/sites-available/default-ssl ) and comment out lines add the following lines 51 & 52 (use a #).
    Then add the following lines right under
    (

    SSLCertificateFile /etc/apache2/ssl/apache.crt

    SSLCertificateKeyFile /etc/apache2/ssl/apache.key 

    )


  5. Finally run ( a2ensite default-ssl )
  6. Restart your apache service ( service apache2 restart )


At this point your should be able to visit your box’s url ( https://localhost or https://127.0.0.1 or https://www.yourdomain.com ) and finish installing owncloud with the native install wizard.
Once your install is complete you will be able to download ownclouds own filesync client or you can use a WebDAV client to navigate through your files. You can do the same for your mobile device or tablet.