Install PiHole With SSL On Apache Running Ubuntu Server 20 LTS

This is another quick post to serve as a general note. This post will cover the install of PiHole with SSL on Apache. The guide should work for most Debian-based Linux distributions. We are running PHP7.4 as it’s native to the OS and does not require any PPA addons. You can install PHP8/+ if you like.

Step 1: Bash Into root

sudo bash

Enter your password.

Step 2: Install Apache2

apt-get install apache2 -y

Step 3: Install PHP 7.4

apt-get install php -y
apt-get install php-common php-mysql php-xml php-curl php-cli php-imap php-mbstring php-opcache php-soap php-zip php-intl php-sqlite3 -y

Step 4: Install PiHole

curl -sSL https://install.pi-hole.net | bash

During the course of the install, you will be prompted ~5 times. At the last prompt, you will be asked if you want to install the Lighttpd web server. At this point, you want to select no and complete the install process.

Once completed your PiHole setup should work. and should be accessible via ip/domain.com/admin/

Step 5 Cleanup:

As of today, I have noticed a rare glitch that will cause the folder structure to be odd after the pihole install. This can be easily fixed with the following details.

The default install will create folders like this:

pihole folder: /var/www/html/pihole
admin folder: /var/www/html/admin

Although not a big deal, this causes a problem when trying to access the admin dashboard from the default pihole URL (http://ip/pihole), the link on the page that is supposed to link to the admin page will be broken. At this point, you can update the page link manually in pihole/index.php to forward to the correct URL or you can change/move folders to your liking.

To fix this issue, as root, first we move the folder to the correct directory.

mv /var/www/html/admin /var/www/html/pihole

Second, we update the default pihole root index file links

vim /var/www/www/html/pihole/index.php

We want to edit three lines 77, 81, and 83 to reflect the new URL structure.

#Line 77: 
<link rel='shortcut icon' href='/pihole/admin/img/favicons/favicon.ico' type='image/x-icon'>

#Line 81:
<img src='/pihole/admin/img/logo.svg' alt='Pi-hole logo' id="pihole_logo_splash">

#Line 83:
<a href='/pihole/admin/'>Did you mean to go to the admin panel?</a>

Once done you can consider the process complete.

Step S: Installing SSL on PiHole:

To keep things classy, if not already, bash into root:

sudo bash

Let’s enable the PHP’s SSL module and make our SSL folder to house our certs.

a2enmod ssl
mkdir /etc/apache2/certs/pihole

Now let’s generate our self-signed cert:

openssl req -x509 -nodes -days 365 -newkey rsa:2048 -keyout /etc/apache2/certs/pihole/piholio.key -out /etc/apache2/certs/pihole/piholio.crt

Edit our default SSL virtual hosts config:

vim /etc/apache2/sites-available/default-ssl.conf

Replace lines 32 and 33 with the following lines

SSLCertificateFile /etc/apache2/certs/pihole/piholio.crt
SSLCertificateKeyFile /etc/apache2/certs/pihole/piholio.key

Save and exit.

Next, enable SSL and restart the apache service:

a2ensite default-ssl.conf && systemctl restart apache2

At this point, you’ve successfully installed PiHole with SSL. We have another issue, by default apache does not reroute to SSL so you will still be able to visit the non-SSL URL. To fix this we need to enable the Rewrite module and enter our conditions into our domain’s virtual host configuration (or .htaccess).

Let’s enable that rewrite module:

a2enmod rewrite
systemctl restart apache2

Let’s edit our default virtual host file:

vim /etc/apache2/sites-available/000-default.conf

Add the following three lines of code before the </VirtualHost> closing tag.

RewriteEngine On
RewriteCond %{HTTPS} off
RewriteRule ^ https://%{SERVER_NAME}%{REQUEST_URI} [END,NE,R=permanent]

Save the file and restart Apache.

systemctl restart apache2

Your PiHole install should now be “running in SSL”. If anyone viewing my notes has questions feel free to leave a comment.

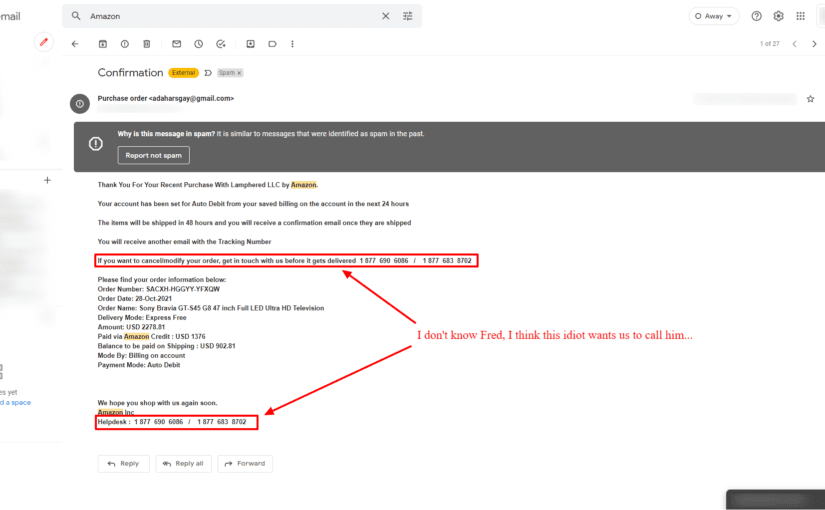
Northwest Victims Tricked Into Calling Scammers Fake Support Number

There seems to be some hilarious tomfoolery going on where victims are tricked into calling a fake support number via email. The worst part is the scammer’s effort or IQ level, put some effort loser, but I digress. The worst part seems to be it targeting the poor (those experiencing financial hardship if you want to be P.C.) as they would be most likely to panic and call. Beware if you’re lucky enough to fall for it, you are further exploited into giving account details, credit cards numbers, nuclear codes, etc. The scam is some basic sh*t but for the uninitiated, it can spell a bad week or month/s of the recovery process. So the moral of the post is if you get a shady email telling you to thank you for your some unknown purchase from Amazon (or wherever), with a crazy price, support numbers listed in the same email multiple times… I’d probably call it, f*ck it.

No, no, don’t call. Validate the sender’s address, no support email from any big company will come from Gmail or Hotmail, it will come from the companies domain. If you’re still in doubt, don’t panic, do a quick search on Google, look up the company visit the site, look up their support information, and contact them. Don’t be a statistic.

New Email Scam Targeting Small-Medium Sized Businesses In The Pacific Northwest

I decided to write a quick post on the topic as I just received one of these new scams and almost fell for it and hopefully can prevent someone else from falling for it. The scam campaign seems to be targeting small-medium sized businesses and may variate in tactics depending on the industry targeted, the email example below is real and should be used as a template for what to look out for.

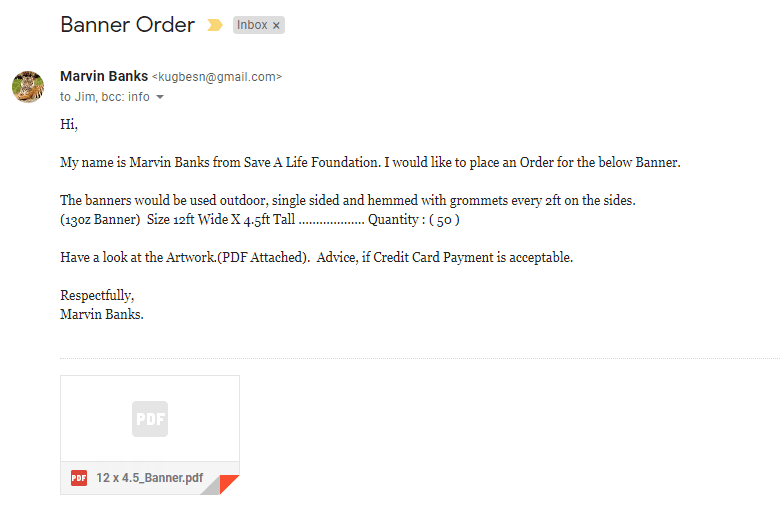
The prospect, in this case, is also the attacker (a fake prospect), sends a vague email as the one below (this is an actual scam email ):


scammer email


It Looks ok, right? Weary of the pdf attachment I scan it for malware or trojan but nothing was detected. I was still weary, being a computer & network security expert I decided to upload it to Google drive (lol) and previewed it there. To my surprise, it actually was a banner design…


fake salf banner


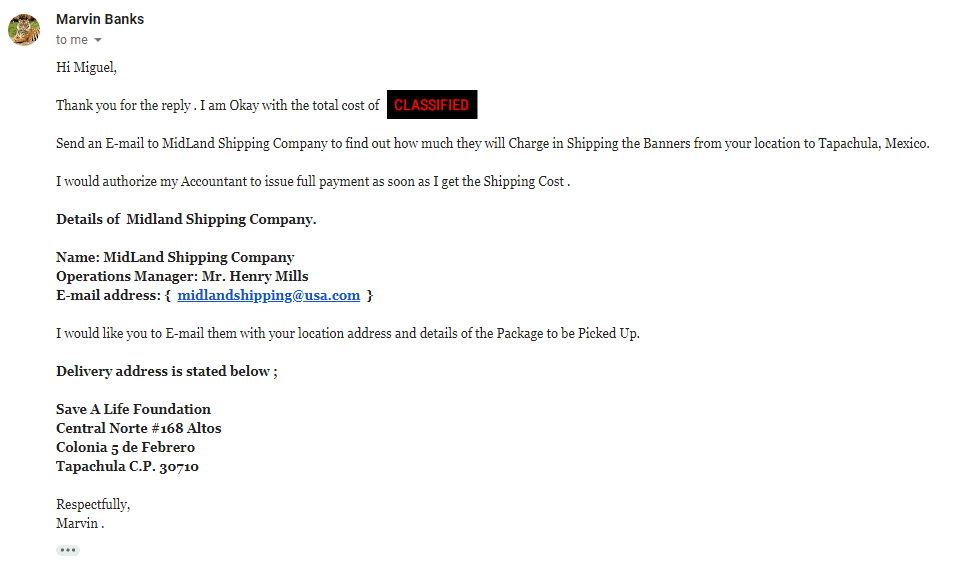
At this point, I was 75% convinced that this was a legitimate prospect. I decided to reply with additional questions required to effectively do the job or at least provide an accurate quote. The next day I received a reply:


scammer reply


After receiving the reply, I took some time to further analyze the entire conversation and began to find problems in his requests such as:

1. His email address, it was a Gmail address, easy to create anonymously.
2. Why is Save A Life Foundation (SALF) making banners for HIV/AIDS?
3. The banners mention sponsors but nothing about the SALF.
4. The banner size is an odd size, not a standard size, and doesn’t mind “any good” size.

Still weary but curious, I decided to go further down the rabbit hole and give them a quote which they then replied:


scam email 3


After I received this response I was convinced it was a scam and decided to do some research.

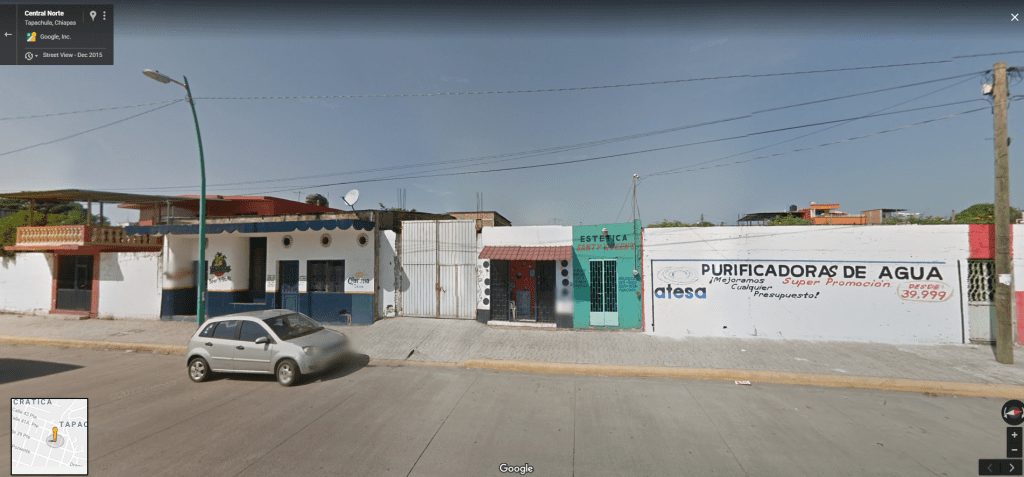
So SALF is asking me to send banners to a Mexican Address huh? let’s check it out…


Yeah doesn’t look like the Save a Life Foundation unless they’ve downsized and are outsourcing now, it’s obviously not any organization saving lives.

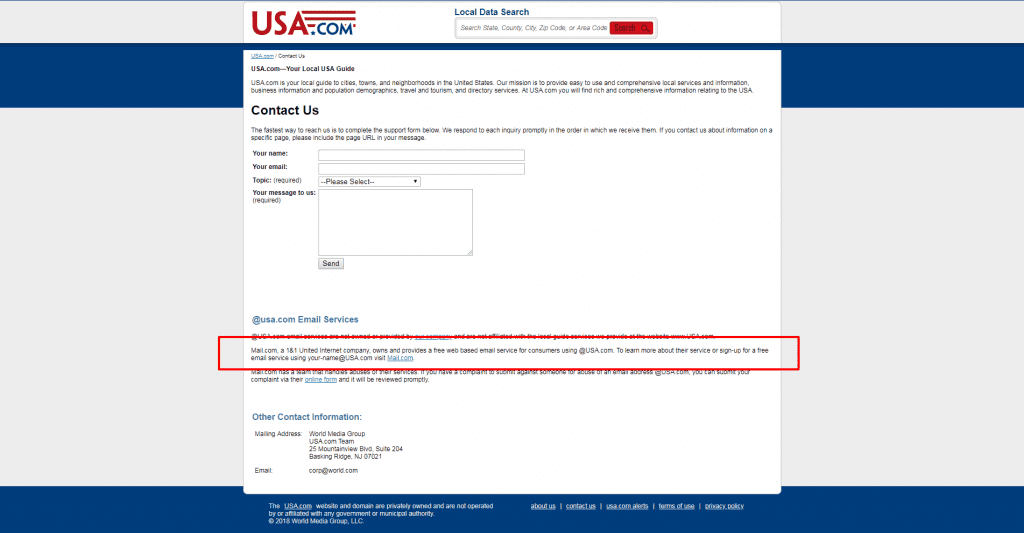
The email midlandshipping@usa.com looks absolutely wrong but somewhat legitimate because of the @usa.com domain behind it, which is why attacker used it. Thinking the attacker had compromised a mail server belonging to the domain, I decided to look at the domain in search for their abuse email so I could notify them of a possible breach with their mail server. Upon my search of the usa.com site, I came upon this on the usa.com site contact page.


So now we see how he was able to get the @usa.com email, it’s completely free.

This experience was annoying because of the time wasted but was good practice. I suggest people research companies who want to send your business requests for quotes and then ask to ship outside the country. Make sure their request makes logical sense, someone asking for something in quantity should be asking for standardized items and should require a standardized transactional process, no special or shady instructions, if it feels wrong don’t do it! In my case, it saved me a few thousand dollars that would have been most likely through a chargeback from a stolen credit card the attacker used.

Updating To OpenSSL 1.0.2g On Ubuntu Server 12.04 & 14.04 LTS To Stop CVE-2016-0800 (DROWN attack)

It was a bit difficult to find any real information on fixing the latest openSSL CVE-2016-0800 (DROWN attack) so I decided to write this quick post on how to update your Ubuntu Server 12.04/14.04 OpenSSL (or any debian-based distro with apache2) to the latest 1.0.2g build to avoid the DROWN/Heartbleed attacks. I’m not going to go into the details of how the exploit works and how it’s exploited as there are many blogs/sites that already go over this. Instead I will only focus on the fix, I have provided 2 methods, a method using cURL or wget.

*** UPDATED 7/4/2017 ***
Because this is a popular post, I’ve gone ahead and updated it to reflect latest SSL binaries, it’s good practice to check what the latest binaries are regardless of this post.

cURL Method

  1. sudo apt-get install php5-curl (Install cURL library)
  2. sudo apt-get install make (Install compiling library Make)
  3. curl https://www.openssl.org/source/openssl-1.0.2l.tar.gz | tar xz && cd openssl-1.0.2l && sudo ./config && sudo make && sudo make install (single command that will download latest binaries, extract them, cd into the directory, compile configuration and then install the files)
  4. sudo ln -sf /usr/local/ssl/bin/openssl ‘which openssl’ (This will create a sym link to the new binaries)
  5. openssl version -v (Used to check the version of the Current OpenSSL binaries)

wget method

  1. sudo apt-get install make (Install compiling library Make)
  2. wget https://www.openssl.org/source/openssl-1.0.2l.tar.gz (Download the latest OpenSSL 1.0.2g binaries)
  3. tar -xzvf openssl-1.0.2l.tar.gz (Extract the tar ball to the local directory)
  4. cd openssl-1.0.2l (Enter extracted OpenSSL directory)
  5. sudo ./config (Configure binaries for compiling)
  6. sudo make install (install configured binaries)
  7. sudo ln -sf /usr/local/ssl/bin/openssl `which openssl` (This will create a sym link to the new binaries)
  8. openssl version -v (Used to check the version of the Current OpenSSL binaries)

This was tested on both Ubuntu Server 12.04 & 14.04 LTS versions. Questions? Comments?

Listing The Last Modified Files In Debian Or Ubuntu

You might be asking yourself why would I care to list the last modified file/s right? Well if your in the security world then you know sometimes it’s important especially in a compromised server/workstation. It’s important to check what files may have been modified to help the attacker, for example, the editing of native configurations or scripts can facilitate permanent access to a system. It’s also important when trying to identify the potential root of the problem.


This command will list all files that were recently modified by without any real order.

ls -t

This command will list all files that were recently modified separating all file names by line by line.

ls -1t

This command will list all files that were recently modified separating all file names by line by line and limiting the amount displayed by 10

ls -1t | tail -10


I am sure there are more aggressive methods but this is a simple one that works pretty solid on any Linux distribution with bash.

How To Spot A Malicious Email

Today I get an email that looks like it came from GoDaddy except for a few things that don’t look right…
Email Headers are not correct, this was obviously a shitty job as the malicious user tried to make the email look like it was coming from godaddy but was actually coming from a compromised wordpress install on Hostgator.

From: Godaddy <donotreply@m.godaddy.com>
Message-Id: <E1YXF6r-0008QX-BX@gator4163.hostgator.com>

The Email:

Dear Customer MIGUEL VALLEJO. Confirm Your Identify.

An unknown user was trying to login your GoDaddy account with an incorrect password on Sunday 15 March , 2015 1:05 GMT, and with an unknown DNS IP Location:
(China) ip=36.250.74.87, as a result of that we partially blocked your GoDaddy accounts due to major security protocols.

Kindly visit our GoDaddy account Re-Activation Center Click here :
https://accounts.godaddy.com/do.php?check=e3251075554389fe91d17a794861d47be3251075554389fe91d17a794861d47b

We are sincerely sorry for any inconvenience.
GoDaddy Customer Support.
– – – – – – – – – – – – – – – – – – – – – – – – – – – – – – – – – – – – – –
Copyright (c) 1999-2015 GoDaddy.com, LLC. All rights reserved.


Except for the fact that there is no administrative contact info, phone, business address in the signature it looks somewhat legit. Now Lets look at body of the email specifically at the url and where the link points to…
http://someweirddomain.com/wp-includes/css/nvldigkoua.htm?nvldigkoua=e3251075554389fe91d17a794861d47b

So this is obviously a malicious email, a targeted one because the user had to go through some effort to put this type of attack together. Sadly this is someone trying to dupe you into coughing up your password or in my case a sad attempt at doing so.
It’s a good idea to go over some security logs after events like this as it could be a sign of someone already in your network and trying to escalate their access.
In my case it was just some noob who though he was dealing with a end user, my response… <^>-_-.

Increase In Brute Force Attacks on American Networks By Chinese Networks on 4th of July.

I started to track my security logs a lot more since I began to notice the amount of alerts I was getting via email on holidays. There is definitely a connection, American networks are under attack during American holidays specifically from 00:00 to 14:00, this time the attacks weren’t just coming from Chinese networks but Mexico & France.

Here is a list of the latest culprits…

inetnum:        61.174.51.192 – 61.174.51.255
netname:        HANGZHOU-SRT-TECHNOLOGY-CO-LTD
country:        CN
descr:          HANGZHOU SRT TECHNOLOGY CO., LTD


inetnum:        115.239.248.0 – 115.239.248.255
netname:        MOVEINTERNET-NETWORK
country:        CN
descr:          MoveInternet Network Technology Co.,Ltd.
descr:
admin-c:        CJ1872-AP
tech-c:         CS64-AP
mnt-irt:        IRT-CHINANET-ZJ


inetnum:        183.0.0.0 – 183.63.255.255
netname:        CHINANET-GD
descr:          CHINANET Guangdong province network
descr:          Data Communication Division
descr:          China Telecom
country:        CN
admin-c:        IC83-AP
tech-c:         IC83-AP


inetnum:        111.72.0.0 – 111.79.255.255
netname:        CHINANET-JX
descr:          CHINANET JIANGXI PROVINCE NETWORK
descr:          China Telecom
descr:          No.31,jingrong street
descr:          Beijing 100032
country:        CN


inetnum:        117.21.0.0 – 117.21.255.255
netname:        CHINANET-JX
descr:          CHINANET Jiangxi province network
descr:          China Telecom
descr:          No.31,jingrong street
descr:          Beijing 100032
country:        CN


inetnum:        202.109.128.0 – 202.109.191.255
netname:        CHINANET-JX
descr:          CHINANET Jiangxi province network
descr:          Data Communication Division
descr:          China Telecom
country:        CN


inetnum:        89.248.162.128 – 89.248.162.255
netname:        NL-ECATEL
descr:          AS29073, Ecatel LTD
country:        NL


inetnum:        212.83.128.0 – 212.83.153.255
netname:        FRWOL
descr:          Tiscali France
country:        FR

NetRange:       168.243.0.0 – 168.243.255.255
CIDR:           168.243.0.0/16
OriginAS:
NetName:        LACNIC-ERX-168-243-0-0
NetHandle:      NET-168-243-0-0-1


Its probably nothing to worry about…

It’s Official, China Is Undeniably Attacking US Networks 400% Increase In Network Attacks Over Holiday Weekends.

Ok so I am not here to point fingers because both governments pretty much do the same thing duh… I will also add that Chinese attacks on US networks have increased in the past few months since the conflicts in Ukraine. Over this memorial weekend I have been monitoring many server nodes across different data centers and have definitely had in increase in brute force and scan attacks.

Today I have noticed a 400% increase in additional log records related to these attacks. Coincidence I think not, how else do you explain an increase in attacks a day before a major US holiday? Chinese PLA will obviously deny anything but if you analyze the data it definitely looks like a coordinated attack on US networks .Chinese Intelligence Assumes that no IT personal will be working over the weekend so they amp their attacks. Let let me say something to Chinese Intel… YES WE WORK ON HOLIDAYS TOO!… lol

P.S. I have logs to prove that too… xD

Here is a list of their most popular attack networks…

inetnum:        61.174.51.192 – 61.174.51.255
netname:        HANGZHOU-SRT-TECHNOLOGY-CO-LTD
country:        CN
————————————————————————–
inetnum:        42.62.0.0 – 42.62.127.255

netname:        Forest-Eternal
descr:          Forest Eternal Communication Tech. co.ltd
descr:          Rm.902,North Real Estate Building, Build. No.3,
descr:          #81Yuan,Haidian District,Beijing
country:        CN

————————————————————————–

inetnum:        116.8.0.0 – 116.11.255.255
netname:        CHINANET-GX
descr:          CHINANET Guangxi province network
descr:          Data Communication Division
descr:          China Telecom
country:        CN

————————————————————————–

inetnum:        61.191.0.0 – 61.191.255.255
netname:        CHINANET-AH
descr:          CHINANET Anhui province network
descr:          China Telecom
descr:          A12,Xin-Jie-Kou-Wai Street
descr:          Beijing 100088
country:        CN

————————————————————————–

inetnum:        117.79.80.0 – 117.79.95.255
netname:        SANXIN
descr:          Beijing Sanxin Shidai Co.Ltd
descr:          1513 Xinjishu building Beijing link west road
descr:          Haidian District, Beijing, PRC
country:        CN


Adding “client denied by server configuration” Filter To Fail2Ban: Ubuntu 12.04 LTS

Ok so here is another useful filter for fail2ban. Once this plugin is installed it will prevent malicious visitors from trying to brute-force folder and file discovery. After 5 attempts to visit a non existing file/folder the visitor is banned…

like always… BASH IN! :D

sudo bash

First Lets create a new entry in our jail.local file…

vim /etc/fail2ban/jail.local


copy the following text after the last apache entry…

[apache-clientd]
enabled = true
port = http,https
filter = apache-client-denied
logpath = /var/log/apache*/*error.log
maxretry = 5


Now that we have added the entry into our jail.local we proceed, change to the filter.d directory, in this folder you will see lots of other pre-configured filters

cd /etc/fail2ban/filter.d


instead of creating a new filter file simply copy another, this will make the next step easier…

cp /etc/fail2ban/filter.d/apache-auth.conf /etc/fail2ban/filter.d/apache-client-denied.conf


find the line identical to the one below (Line 23)

failregex = ^%(_apache_error_client)s user .* (authentication failure|not found|password mismatch)\s*$


replace it with the following one.

failregex = [[]client <HOST>[]] client denied by server configuration:


At this point your pretty much done, close the file and restart fail2ban

service fail2ban restart


Comment if you have questions, like my post if you find it helpful :)


Adding “File Does Not Exist” Filter To Fail2Ban: Ubuntu 12.04 LTS

Ok so here is a quick post to a common question… adding a filter to fail2ban for bot/scanners searching for files, folders or simply doing recon which can result in exploit discovery, this filter will automatically block a visitor/bot after 4 attempts to scan for a file that does not exist on your domain/server.

like always… BASH IN! (lol…)

sudo bash

First Lets create a new entry in our jail.local file…

vim /etc/fail2ban/jail.local


copy the following text after the last apache entry…

[apache-nofile]
enabled = true
port = http,https
filter = apache-nofile
logpath = /var/log/apache*/*error.log
maxretry = 4


Now that we have added the entry into our jail.local we proceed, change to the filter.d directory, in this folder you will see lots of other pre-configured filters

cd /etc/fail2ban/filter.d


instead of creating a new filter file simply copy another, this will make the next step easier…

cp /etc/fail2ban/filter.d/apache-auth.conf /etc/fail2ban/filter.d/apache-nofile.conf


find the line identical to the one below (Line 23)

failregex = ^%(_apache_error_client)s user .* (authentication failure|not found|password mismatch)\s*$


replace it with the following one.

failregex = [[]client <HOST>[]] File does not exist:


At this point your pretty much done, close the file and restart fail2ban

service fail2ban restart


Comment if you have questions, like my post if you find it helpful :)