
OpenClaw Is Not About Privacy. It Is About Leverage.

Much of the public conversation around OpenClaw centers on privacy, safety, and regulation. Those are visible concerns and easy entry points for debate. But after working with OpenClaw for over a month, I do not think privacy is the real reason large companies are uneasy. The real issue is leverage.

For a long time, meaningful technical capability required scale. If you wanted to build something ambitious, you needed capital, infrastructure, coordination, and time. Entire departments were required to handle architecture, DevOps, testing, analytics, compliance, customer support, documentation, and iteration. Complexity itself became the moat.

This structure created a kind of technical monopoly. Not always malicious, often just structural. If you did not have money, talent density, and a long runway, you simply could not compete at a certain level. OpenClaw disrupts that dynamic by compressing institutional capability into orchestrated systems.

The Shift From Headcount to Orchestration

Historically, building a decentralized communication platform or an alternative SaaS product meant assembling a team across multiple disciplines. Backend engineers, frontend developers, infrastructure specialists, QA, security engineers, and product managers all played distinct roles.

Now consider a different model. You design the architecture while agents scaffold the codebase. Other agents write integration tests and simulate load and edge cases. Deployment pipelines are automatically generated and validated. Documentation is created alongside development. Monitoring and observability are configured from day one.

The bottleneck shifts. It is no longer about how many people you can hire. It becomes a matter of how effectively you can orchestrate intelligence. That shift changes who gets to build.

The Real Implication for Decentralization

People have talked about a decentralized web for years. Decentralized identity, messaging, storage, publishing, and payments have never lacked vision. Execution was the constraint. These systems required sustained coordination across large teams and funding cycles. Even well-intentioned projects often stalled because the technical lift was enormous.

When orchestration agents reduce development friction, decentralization stops being purely ideological and becomes practical. The cost of experimentation drops. The time to prototype shrinks. Dependency on institutional backing weakens. This does not guarantee a better world, but it does increase optionality. That matters.

The End of Artificial Scarcity in Software Creation

One of the less-discussed consequences is the erosion of artificial scarcity in software capabilities. For years, certain types of systems were out of reach for individuals or small teams, not because they were conceptually impossible, but because they were operationally expensive.

AI orchestration reduces that operational tax. When testing, refactoring, performance profiling, documentation, and portions of security review can be automated, the economic barrier to entry falls. The result is not chaos. It is acceleration. More systems get built. More ideas get tried. Some fail. Some change industries. Innovation becomes more distributed.

Enterprise Will Not Disappear. It Will Reconfigure.

This is not about eliminating jobs or collapsing corporations. It is about reconfiguration. Organizations will scale less through headcount and more through orchestration density. A smaller number of highly skilled engineers coordinating intelligent systems can outperform large, siloed departments operating manually.

Sales workflows can be modeled and iterated automatically. Customer support systems can self-analyze and refine. Compliance documentation can be continuously generated and validated. Analytics models can be stress-tested in real time. Departments do not vanish. They compress and integrate. Competitive advantage shifts from budget size to system design quality.

The Myth of “Anyone Can Do It”

There is a growing narrative that AI orchestration tools mean anyone can build anything. That is not accurate. You can issue commands to an agent, but that does not mean you understand how to communicate with it effectively.

Clear outputs require clear intent. Clear intent requires structured thinking. If you do not understand systems, constraints, tradeoffs, and architecture, your results will reflect that. Orchestration is not magic. It is an amplified instruction. The quality of the system depends on the quality of the operator.

The individuals who will thrive in this environment are not those who simply issue commands. They are those who can model problems clearly, define constraints precisely, and anticipate failure modes. Communication becomes a technical skill.

The Shortest Path Problem

Logical systems tend to optimize for the shortest paths. Given a start state and a goal state, the system attempts to minimize distance, cost, or time. In an empty room, moving from point A to point B in a straight line is efficient.

Real systems are not empty rooms. In software engineering, the shortest path is not always the safest, most maintainable, or most secure path. When orchestration systems are not guided by carefully defined constraints, they often produce the most direct solution that satisfies the objective. That solution may function and even pass initial tests, but it can introduce hidden risks.

This helps explain reports of AI-generated code being insecure or operationally fragile. Without explicit guardrails, systems optimize for functional completion rather than long-term resilience. A system told only to “make this work” will likely make it work. It may not make it safe.

Capability Symmetry and the Security Escalation Problem

The same compression of capability that enables independent builders also lowers the barrier for adversarial actors. Orchestration frameworks do not distinguish between productive and malicious intent. They execute structured objectives.

Automated reconnaissance, vulnerability mapping, exploit chaining, and social engineering workflows can be modeled and iterated with far less manual effort than before. Historically, large-scale network attacks required specialized teams, tooling, and experience. Now, elements of that process can be automated, refined, and redeployed at speed.

This creates capability symmetry. Defenders gain acceleration, but so do adversaries. Security has always been an asymmetrical problem. Attackers need one successful vector. Defenders must secure the entire surface area.

As orchestration systems amplify both sides, defensive discipline becomes more important than ever. Acceleration without defensive maturity is a liability. Acceleration paired with architectural rigor, monitoring, and operational security is an advantage.

Creativity Becomes the Primary Constraint

If infrastructure becomes easier to build and operational load becomes lighter, the limiting factor shifts to vision. What do you build? Why does it matter? Who does it serve?

When infrastructure ceases to be the primary barrier, responsibility shifts to creators. Orchestration tools reduce execution costs. They do not lower the cost of judgment.

What once required a boardroom can now begin at a workstation. What once required a funding round can now start as a coordinated experiment. Not everyone will succeed, but more people can try. Historically, that is when progress accelerates.

What are your thoughts?

Install Syncthing on Debian 11 or Proxmox LXC container

Syncthing on the Debian 11

If you’re on this page I am going to assume you already know what Syncthing is.

This same setup should work on any of the latest Debian-flavor distros, no need to include additional Apt sources or GPG keys, Syncthing has been included in the Debian 11 apt repository as of 2/22/23.

apt-get update && apt-get upgrade -y
apt-get install apt-transport-https -y

then

apt-get install syncthing -y

to make sure it has been installed…

syncthing --version

you should get something similar to:

syncthing v1.12.1-ds1 "Fermium Flea" (go1.15.9 linux-amd64) debian@debian 2021-07-23 20:27:51 UTC

This confirms that it is indeed installed.

Now we need to create a service file for systemd to start our Syncthing automatically as a system service. This configuration will allow you to access your Sycthing dashboard from any computer on your local network. YOU WILL STILL NEED TO ADD CREDENTIALS TO YOUR SYNCTHING GUI.

You can use vim or nano as your editor of choice.

nano /etc/systemd/system/syncthing@.service

Add the following lines to your syncthing@.service service file. The service file makes your Syncthing install accessible over the local network by default. By default, Syncthing uses port 8384, feel free to change it to your liking.

[Unit]
Description=Syncthing - BAMF Open Source File Synchronization for %I
Documentation=man:syncthing(1)
After=network.target

[Service]
User=%i
ExecStart=/usr/bin/syncthing -no-browser -gui-address="0.0.0.0:8384" -no-restart -logflags=0
Restart=on-failure
SuccessExitStatus=3 4
RestartForceExitStatus=3 4

[Install]
WantedBy=multi-user.target

Save and close the file when you are finished. Then, reload the systemd daemon to apply the changes.

systemctl daemon-reload

Next, start the Syncthing service with the following command:

systemctl start syncthing@root

To access the server over your network you can simply get your local network address using

ip r

You should get a response like, the last value is your local network address:

default via 192.168.1.1 dev eth0
192.168.1.0/24 dev eth0 proto kernel scope link src 192.168.1.10

We access our Syncthing dashboard by opening our browser of choice and entering http://192.168.1.10:8384 , note that, by default, Syncthing runs on port 8384. Depending on your application, if you’re server is a firewall running on it, you will need to update your settings to allow traffic on those ports or whatever ports you decide to use later.

Once logged into your dashboard you will want to update your GUI access settings. After securing your Syncthing dashboard you can then further customize your settings to your preferences.

Mounting A Windows Shared Folder/Drive For Syncthing Storage

If you have a NAS and want to mount a Windows shared drive as a storage option for Syncthing:

apt-get update && apt-get upgrade -y
apt-get install cifs-utils -y

Assuming you already have a Shared Windows Folder/Drive setup, we create a folder in our standard mnt directory:

mkdir /mnt/Syncthing

To test our connection, we mount our Windows Share drive:

mount -t cifs -o username=windowsUsername,password=windowPassword //COMPUTER_IP/SharedFolderName /mnt/Syncthing

If successful you can see your mounted folder’s content via /mnt/Syncthing

Due to the nature of Linux, this drive mount will not persist after reboot . In order to add persistence to the mount you will need to do some additional configuration to fstab.

Before we add details to our fstab, let’s create a file to store our Windows share credentials, storing in the root folder will also protect from other possible non-root users accessing the file. You can change this folder to whatever you like just keep in mind that if you have multiple users and don’t want them to see the contents of the file you will need to add additional permissions to the credentials file.

Create the local credentials file like this:

vim /root/windows_credentials

We then enter the corresponding details, don’t be a noob and actually enter windowsUsername and windowsPassword, enter your actual share details…

username=windowsUsername
password=windowsPassword

Save the file.

Now we edit our fstab

vim /etc/fstab

We add the following line:

//COMPUTER_IP/SharedFolderName  /mnt/Syncthing  cifs  credentials=/root/windows_credentials,file_mode=0755,dir_mode=0755 0       0

Save the file.

Mount the share:

mount /mnt/Syncthing

Tired of the mounted folder? Simply unmount it like this:

unmount /mnt/Syncthing

If you do unmount, don’t forget to remove the line from your fstab.

General note: when mounting folders, always mount to a new folder, don’t try to mount to an existing folder or you’re going to have fun figuring out what happened to the files you had in it…

Installing MariaDB + PHPMyAdmin on Debian 11/Debian 11 Proxmox LXC Container

Installing MariaDB 10.5

apt update; apt upgrade -y
apt -y install curl software-properties-common gnupg2

then

curl -LsS -O https://downloads.mariadb.com/MariaDB/mariadb_repo_setup
bash mariadb_repo_setup --mariadb-server-version=10.5

then

apt install mariadb-server mariadb-client -y

then

mariadb-secure-installation

when prompted…

Switch to unix_socket authentication [Y/n]    (Answer: n)
Change the root password? [Y/n]               (Answer: n)
Remove anonymous users? [Y/n]                 (Answer: y)
Disallow root login remotely? [Y/n]           (Answer: n)
Remove test database and access to it? [Y/n]  (Answer: y)
Reload privilege tables now? [Y/n]            (Answer: y)

Install Apache2

apt install apache2 -y

Install PHP

We are using this server strictly for MariaDB, to make things simple, we can install our OS’s native PHP version, in Debian 11’s case that would be PHP 7.4. If needed PHP8 will also work.

apt install php php-common php-mysql php-gd php-cli -y
service apache2 restart

Install PHPMyAdmin

apt install phpmyadmin -y

log into MariaDB and create our Database Administrative user.

mysql -u root -p

once you’ve logged in, we create our new Administrative user via MySQL/MariaDB cli, take note of the bold words, don’t forget to use unique values if copy and pasting.

CREATE USER Administrator@localhost IDENTIFIED BY "mysecretpassword";
GRANT ALL PRIVILEGES ON *.* TO Administrator@localhost WITH GRANT OPTION;
FLUSH PRIVILEGES;

exit

once outside MariaDB’s cli and back into Debian’s terminal

service mysql restart

Install Vim (text editor)

apt install vim -y

Adding SSL/HTTPS Support to Apache/PHPMyAdmin

a2enmod ssl
a2enmod rewrite

Prepare our apache folder for SSL cert storage

mkdir /etc/apache2/certs/ssl

then

openssl req -x509 -nodes -days 365 -newkey rsa:2048 -keyout /etc/apache2/certs/ssl/ssl.key -out /etc/apache2/certs/ssl/ssl.crt

once completed with cert detail prompts you will want to edit apache’s defaut site config

vim /etc/apache2/sites-available/000-default.conf

Add the following three lines of code before the </VirtualHost> closing tag.

RewriteEngine On
RewriteCond %{HTTPS} off
RewriteRule ^ https://%{SERVER_NAME}%{REQUEST_URI} [END,NE,R=permanent]

Finally we enable our ssl configuration and restart our apache services

a2ensite default-ssl.conf && systemctl restart apache2

to get your local server IP address, inside terminal use the following

ip addr

once you have your server’s local network address you should be able to access it from any computer on the same subnet using putty.

For this example, the server sits on the same local network. If you wanted to host the server remotely and access phpmyadmin you would likely use certbot to autogenerate validated ssl certs.

Fake Online Pet Store Scams Are On The Rise

Anyone considering buying a pet via a website should be wary of making any payments until you have done aggressive research on the facility/kennel!

Over the past year, and due to covid lockdowns, there has been an increase in websites selling pets. In some cases, these sites are entirely fake. This type of scam is particularly crueler, much like the popular scams targeting the less tech-savvy using fake refund/bank/amazon login sites.

The scam goes a little like this:

  • Attackers setup a fake website, usually using something like WordPress.
  • Attackers then go to various websites and steal images of real dogs belonging to other kennels/sellers.
  • Attackers then set up a fake marketplace utilizing the stolen content.
  • Attackers then optimize their websites to rank higher then real kennels.

Due to the nature of how idiotic SEO algorithms are, buyers are funneled in directly to the fake site via search engines. Once on the site, the attackers use multiple metrics to optimize their profiles and ultimately scam their targets.

How To Avoid Being Scammed By Fake Pet Store Sites

  1. Do Your Research, Call, Visit (if you can), ask for a Zoom, Skype, Duo, or Facetime video call.
  2. If You are paying a premium price for a high-end breed, Look up the kennel club’s information, the American Kennel Club Is a first good step.
  3. Take the profile picture of the site’s pet profile and do a quick Google Image Search, make sure it’s not a stock photo or a stolen image from another site.
  4. Watch out for foreign accents.
  5. Ask for a license, visit their state’s or local municipality’s website and verify their license. You should be able to call a customer service line as well.
  6. Don’t use giftcards, cryptocurrency, zell, cash, check. Use PayPal or a Credit Card which offers better protection from such scams.

As a previous pet owner, I know how falling for a scam like this can upset anyone. Hopefully, these quick tips will have helped someone trying to get a pet do it a bit more safely and, most importantly, not fall for a potential scam.

When your new pet gets home, don’t forget to buy them lots of treats!

The Inherit Dangers Of Nextdoor And How It’s Really Facebook 2.0

Like any other person, at first, I was intrigued by the idea of getting to know your neighbor. So I decided to sign up and check out the site nextdoor.com. After a few minutes, I noticed a similar pattern, and no, it was not the complete ripoff of Facebook’s wall design (American “innovation” nowadays). It Was happening everywhere, people ranting, complaining, whining, everyone’s an “expert,” you know, the same mental disease that is rampant across all self-proclaimed “social” networks. This problem got worse during the holidays, the hyper-feminine neighborhood soyboys felt entitled to their ways, and every neighbor had to comply.

During my testing, I began to post random rants and content to test out and study their algorithms’ flagging and censorship mechanics, which ended up basic, mob, or moderator rule. At some point, an appointed neighborhood “Lead” or snitch was introduced as a tertiary mechanism. As time progressed, the site became a mouthpiece for local governments, mandated posts you can’t comment on, flag, or remove. A Flood of COVID ads everywhere primarily sponsored the local municipalities and shoved down your throat with no way to opt-out. If you asked the wrong questions about COVID or any “sensitive” subject for that matter, you would get a canned notice the next time you log in. The warning was generalized or vague, only highlighting misinformation. If you’d continue, you could safely assume your account would be suspended indefinitely to protect the idiocracy. For me, this was a huge red flag, especially when recognizing the same evolving pattern from Facebook, pretending to be a place for people to meet and have discourse. At the same time, a single narrative is being propagated and used to manipulate behavior, all thanks to their centralized ivory tower.

After a month of being active on the platform, I concluded that Nextdoor is again for the self-absorbed sheep that didn’t learn from Facebook and probably never will. Plain and simple, the platform presents a clear and present danger to any country that uses it. Why would I say that? Because they mimic Facebook in every way, except their local content/data is more accurate. Nextdoor is also much better at staying under the radar while being more aggressive; they have quietly mapped out all US communities or countries with access. They then give or sell unknown access to the highest bidder, which could then monitor the local community’s opinions, sentiment, dissent. They can use various datasets from others users to create algorithms to find patterns within their ecosystem. That data can then be weaponized to identify a specific category, people, targets, or forecast behavior. As with Facebook, the possibilities are endless.

Before deactivating my test account, I requested a copy of my user dataset. After a few minutes, I had a nice zip file with my partial history in various .csv files:

  • Comments
  • Days Active
  • Devices
  • Email Notification Preferences
  • Invitations Sent
  • Posts
  • Private Messages
  • Profile Information
  • Push Notification Preferences
  • Reactions
  • Recommendations
  • Seasonal Activities
  • Targets Ads
  • Topics
  • Verification Information

When I had the chance, I did not use their app as the permissions it was asking for were ridiculous and out of context of what would be necessary to interact with the platform. In other words, it was invasive privacy-wise. If I had used their app, I would probably have another file called Tracking with a log of geolocations pings, unless, of course, that is part of what you don’t get to see. For your safety, of course…

The Danger Of A Malicious User Or State-Actor

During my time testing the platform with a fake account, I built a simple python script that would scrape the entire neighborhood. After only a few hours, I was able to :

  • Identify and Categorize Neighbors based on Race
  • Identify Neighbors with Metal Disease/Issues
  • Identify and Categorize Complainers
  • Identify Trolls
  • Identify Violent Neighbors
  • Areas with most crime
  • Veterans

With more time, and a little ML, the possibilities would have been endless. Map, identify, correlate, you name it. My advice is to stay off any social network that is not decentralized, period, or be ready to have your profile open-sourced to the highest bidder.

Install Redis NoSQL/Object Cache on Ubuntu Server 18 & 20 LTS

This post is a quick post to serve as a note. Don’t expect long redundant explanations of Redis, NoSQL, Object Caching, or deployment suggestions. I would suggest a visit to their site for more detailed information. For this scenario, we are simply installing Redis on the same local machine as Apache; the following settings should be secure as long as Redis is bound to the localhost. For dedicated setups, you will require some additional configuration in the form of authentication, interface bindings, firewall permissions, and more aggressive hardware specs, specifically RAM. If you encounter any issues, feel free to leave a comment below.

*** Note: No, Redis does not automagically take a PHP application and auto-populate it with objects From a MySQL database. This optimization is done through application logic, in other words, Redis can only be taken advantage of if an application has built-in support for it. This support varies from application to application; from a typical LAMP stack, an application can leverage Redis’s in-memory database to offload or mitigate common queries/datasets from your traditional RDBMS. PHP has a Redis module like MySQL’s PDO module, which has a built-in class that can safely interact with Redis. You can learn more about it using Redis in your PHP app here.***

Step 1: Bash Into root User

sudo bash ("sudo -su" if you prefer)

Enter your password to enter the root superuser account.

Step 2: Preparation

As root enter

apt-get update -y && apt-get upgrade -y && apt-get dist-upgrade -y && apt-get autoremove -y && apt-get autoclean -y

Step 3: Installing Redis

apt-get install redis-server -y

Once the command completes its cycle, proceed to edit redis.conf

vim /etc/redis/redis.conf

Assuming your configuration is clean, you will need to edit the following lines:

#Line 147: change default to: 
supervised systemd
#Line 559: change default to: 
maxmemory 128mb
#Line 590: change default to: 
maxmemory-policy allkeys-lru

Step 4: Testing The Install

To test the Redis install log into Redis’s command-line interface, enter the following command in your terminal window:

redis-cli

To check if you have any data/keys set:

keys *

The last command should have returned 0 or nothing. So let’s make sure Redis can record data, still inside your Redis CLI, enter the following command:

SET dude "BRO"

Let’s query Redis for our stored keypair, inside Redis CLI:

GET dude

You should have gotten a response of “BRO”, if not, 50 pushups noob. You can find a list of all the commands for Redis here.

Step S: Disable Transparent Huge Pages

Transparent Huge Pages support is enabled by default in Ubuntu. Like some database environments, it is recommended to disable THP where Redis is installed.

Inside the terminal run the following command:

echo never > /sys/kernel/mm/transparent_hugepage/enabled

add the same command to a new line inside /etc/rc.local

vim /etc/rc.local

Save and reboot.

shutdown -r now (only cool kids use "reboot")

Step 5 (Optional): Install PHP Module

Redis (Native PHP)

apt-get install php-redis

Redis (PHP8)

apt-get install php8.0-redis

Questions, comments, memes, below.

Install PiHole With SSL On Apache Running Ubuntu Server 20 LTS

This is another quick post to serve as a general note. This post will cover the install of PiHole with SSL on Apache. The guide should work for most Debian-based Linux distributions. We are running PHP7.4 as it’s native to the OS and does not require any PPA addons. You can install PHP8/+ if you like.

Step 1: Bash Into root

sudo bash

Enter your password.

Step 2: Install Apache2

apt-get install apache2 -y

Step 3: Install PHP 7.4

apt-get install php -y
apt-get install php-common php-mysql php-xml php-curl php-cli php-imap php-mbstring php-opcache php-soap php-zip php-intl php-sqlite3 -y

Step 4: Install PiHole

curl -sSL https://install.pi-hole.net | bash

During the course of the install, you will be prompted ~5 times. At the last prompt, you will be asked if you want to install the Lighttpd web server. At this point, you want to select no and complete the install process.

Once completed your PiHole setup should work. and should be accessible via ip/domain.com/admin/

Step 5 Cleanup:

As of today, I have noticed a rare glitch that will cause the folder structure to be odd after the pihole install. This can be easily fixed with the following details.

The default install will create folders like this:

pihole folder: /var/www/html/pihole
admin folder: /var/www/html/admin

Although not a big deal, this causes a problem when trying to access the admin dashboard from the default pihole URL (http://ip/pihole), the link on the page that is supposed to link to the admin page will be broken. At this point, you can update the page link manually in pihole/index.php to forward to the correct URL or you can change/move folders to your liking.

To fix this issue, as root, first we move the folder to the correct directory.

mv /var/www/html/admin /var/www/html/pihole

Second, we update the default pihole root index file links

vim /var/www/www/html/pihole/index.php

We want to edit three lines 77, 81, and 83 to reflect the new URL structure.

#Line 77: 
<link rel='shortcut icon' href='/pihole/admin/img/favicons/favicon.ico' type='image/x-icon'>

#Line 81:
<img src='/pihole/admin/img/logo.svg' alt='Pi-hole logo' id="pihole_logo_splash">

#Line 83:
<a href='/pihole/admin/'>Did you mean to go to the admin panel?</a>

Once done you can consider the process complete.

Step S: Installing SSL on PiHole:

To keep things classy, if not already, bash into root:

sudo bash

Let’s enable the PHP’s SSL module and make our SSL folder to house our certs.

a2enmod ssl
mkdir /etc/apache2/certs/pihole

Now let’s generate our self-signed cert:

openssl req -x509 -nodes -days 365 -newkey rsa:2048 -keyout /etc/apache2/certs/pihole/piholio.key -out /etc/apache2/certs/pihole/piholio.crt

Edit our default SSL virtual hosts config:

vim /etc/apache2/sites-available/default-ssl.conf

Replace lines 32 and 33 with the following lines

SSLCertificateFile /etc/apache2/certs/pihole/piholio.crt
SSLCertificateKeyFile /etc/apache2/certs/pihole/piholio.key

Save and exit.

Next, enable SSL and restart the apache service:

a2ensite default-ssl.conf && systemctl restart apache2

At this point, you’ve successfully installed PiHole with SSL. We have another issue, by default apache does not reroute to SSL so you will still be able to visit the non-SSL URL. To fix this we need to enable the Rewrite module and enter our conditions into our domain’s virtual host configuration (or .htaccess).

Let’s enable that rewrite module:

a2enmod rewrite
systemctl restart apache2

Let’s edit our default virtual host file:

vim /etc/apache2/sites-available/000-default.conf

Add the following three lines of code before the </VirtualHost> closing tag.

RewriteEngine On
RewriteCond %{HTTPS} off
RewriteRule ^ https://%{SERVER_NAME}%{REQUEST_URI} [END,NE,R=permanent]

Save the file and restart Apache.

systemctl restart apache2

Your PiHole install should now be “running in SSL”. If anyone viewing my notes has questions feel free to leave a comment.

Install PHP8 on Ubuntu Server 18 & 20 LTS Running Apache

This post is a quick post to serve as a note, don’t expect long explanations of general LAMP stack design concepts. If you encounter any issues feel free to leave a comment below.

Step 1: Bash Into root User

sudo bash 
#("sudo -su" if you prefer)

Enter your password to enter the root superuser account.

Step 2: Preparation

As root enter

apt-get update -y && apt-get upgrade -y && apt-get dist-upgrade -y && apt-get autoremove -y && apt-get autoclean -y

Step 3: Adding PHP8 Repository

apt-get install ca-certificates apt-transport-https software-properties-common -y

Once the command above completes its process:

add-apt-repository ppa:ondrej/php -y && apt-get update -y

Step 4: Installing PHP8

apt-get install php8.0 libapache2-mod-php8.0 -y && systemctl restart apache2 
apt-get install php8.0-fpm libapache2-mod-fcgid

Enable default PHP8 FastCGI manager module and config:

a2enmod proxy_fcgi setenvif
a2enconf php8.0-fpm

Restart Apache:

systemctl restart apache2

You might need these as well… MySQL, MBString, and MailParse

apt-get install php8.0-mbstring php8.0-mailparse php8.0-mysql php8.0-xml php8.0-zip -y

WordPress Modules

apt-get install php8.0-imagick -y

*****

To get jiggy with it… (installs all PHP modules, typically reserved for DevOps/Sandboxing)

apt-get install php8.0-dev

*****

Once you’re done with installing any additional modules, although not required, it’s recommended you reboot your machine. Let’s do a little cleanup in case something unnecessary (like previous PHP7 packages) was left behind.

apt-get update -y && apt-get upgrade -y && dist-upgrade -y && apt-get autoclean -y && apt-get autoremove -y && reboot

Step 5 (Optional): Additional Caching Modules

Memcached

apt-get install php8.0-memcached

Redis

apt-get install php8.0-redis

ODROID-C2 Headless Ubuntu 20 Image

This is a quick post for anyone who was looking to get a headless image from HardKernal but couldn’t actually find it (It doesn’t exist). This guide will use their hosted image for general security reasons.

Why would you want to do this? If you don’t plan on using it as a desktop. Also, why not save ~100MB of RAM and have an even more stable system.

If you haven’t already you can download the official HardKernal Odroid-C2 Ubuntu Image for your Odroid-C2 here.

Skipping The Install Process…

It’s 2021, I’m not going over the install process. This guide assumes you already have a clean Ubuntu 20 installed (from the OFFICIAL repository) and running on your C2. If your ODROID starts auto-patching security updates as soon as you connect it to your network, let it complete before starting.

(Optional)

You can install whatever ssh server you like for your C2, it will make the process much easier to copy and paste commands.

sudo apt-get install openssh-server -y

Removing Mate

sudo apt-get purge $(dpkg --list | grep MATE | awk '{print $2}')

Once the command above completes, continue removing additional traces left behind

sudo apt-get purge libmate-sensors-applet-plugin0 -y && sudo apt-get purge libmateweather-common libmateweather1:amd64 -y && sudo apt-get purge mate-accessibility-profiles -y && sudo apt-get purge mate-notification-daemon -y && sudo apt-get purge mate-notification-daemon-common -y && sudo apt-get purge plymouth-theme-ubuntu-mate-logo -y && sudo apt-get purge plymouth-theme-ubuntu-mate-text -y

Finally Remove The LightDM “Screen Greeter”

sudo apt-get remove lightdm -y

Additional Apps You Might Want To Remove

This is what I chose to remove, feel free to remove any apps you also wont be using without any desktop GUI.

sudo apt-get remove firefox -y

Finish cleaning up

sudo apt-get autoclean -y && apt-get autoremove -y && reboot

That should pretty much sum up the process, let me know if you encounter any issues.

Northwest Victims Tricked Into Calling Scammers Fake Support Number

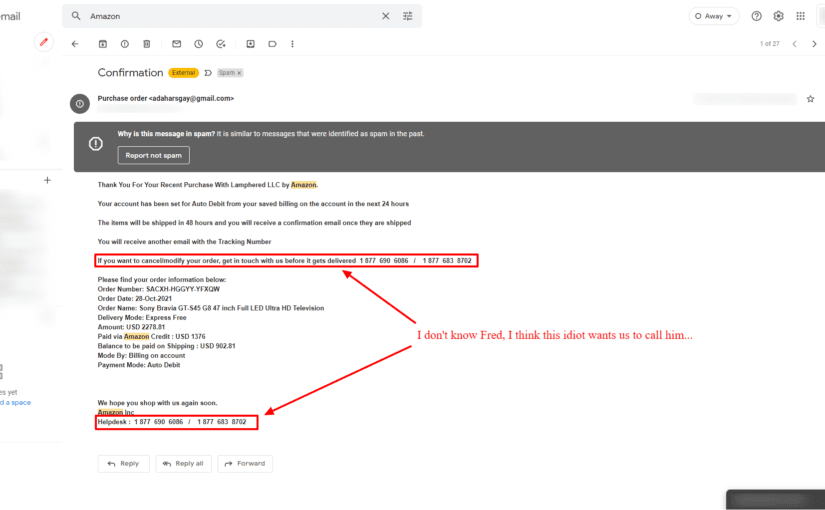
There seems to be some hilarious tomfoolery going on where victims are tricked into calling a fake support number via email. The worst part is the scammer’s effort or IQ level, put some effort loser, but I digress. The worst part seems to be it targeting the poor (those experiencing financial hardship if you want to be P.C.) as they would be most likely to panic and call. Beware if you’re lucky enough to fall for it, you are further exploited into giving account details, credit cards numbers, nuclear codes, etc. The scam is some basic sh*t but for the uninitiated, it can spell a bad week or month/s of the recovery process. So the moral of the post is if you get a shady email telling you to thank you for your some unknown purchase from Amazon (or wherever), with a crazy price, support numbers listed in the same email multiple times… I’d probably call it, f*ck it.

No, no, don’t call. Validate the sender’s address, no support email from any big company will come from Gmail or Hotmail, it will come from the companies domain. If you’re still in doubt, don’t panic, do a quick search on Google, look up the company visit the site, look up their support information, and contact them. Don’t be a statistic.